Not everyone has the full use of their fingers, and that’s a problem when it comes to such common iPhone “gestures” as pinching and swiping the touchscreen.
The solution: “AssistiveTouch,” a helpful iOS feature that lets you create a custom menu of multitouch gestures that you can perform with just a few taps, no pinching or swiping required.
Indeed, once you’ve got AssistiveTouch up and running, you can do just about anything on your iPhone (or iPad, or iPod Touch) with a single fingertip, or even a stylus.

Tap the little translucent circle and a menu of AssistiveTouch buttons will appear.
To turn on AssistiveTouch, you just…
- Go to the main iPhone/iPad home page and tap Settings, General, and Accessibility.
- Scroll down to the bottom of the page, tap the AssistiveTouch option (it’s under the Physical & Motor heading), and tap the “On” switch at the top of the following screen.
Once that’s done, you should see a translucent square in the top-left corner of the display; tap it, and a menu with four icons—Siri, Favorites, Device, and Home—should appear.
Tap the “Device” icon, and you’ll see a series of five more one-touch options: Lock Screen (which essentially locks your phone with a tap), Rotate Screen, Volume Up, Volume Down, and Unmute/Mute.

Thanks to AssistiveTouch, you can snap a screenshot, “shake” your iPhone, reveal the multitasking bar, and more—all with a simple tap.
Tap the More button, and you’ll get a few more AssistiveTouch options: Gestures (we’ll get to that in a moment), Screenshot (yep, for one-touch screenshots), Multitasking (to reveal the iOS multitasking bar without double-clicking the actual Home key), and Shake (perfect for using the iPhone’s “shake to undo” feature without actually shaking the handset).
Visit the AssistiveTouch “Gestures” menu to try two-, three-, four-, and even five-finger gestures with just a single fingertip—handy for those nifty iPad gestures that let you (for example) switch from one app to another with a four-finger swipe.
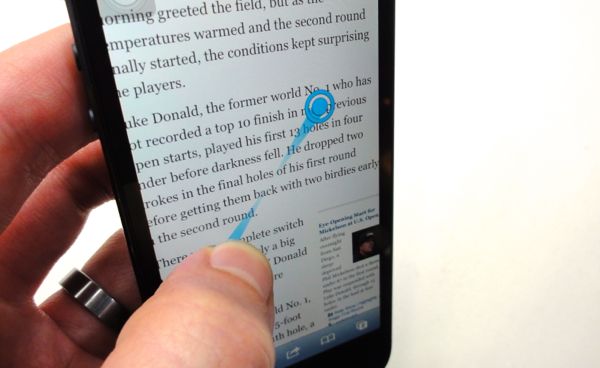
The “Favorites” icon is where you’ll find the famous iPhone “pinch” gesture, most often used for zooming in on a web page or a photo.
Tap “Pinch,” and a pair of blue, fingertip-sized dots connected by a thin bar will appear; just tap and pull with one finger to “pinch” the screen.

Four- and five-finger iPad gestures get a whole lot easier with AssistiveTouch on the case.
Even better, though, is the option to create your own gestures. Tap the “+” sign to “record” any gesture you want—say, a downward swipe.
For example, to scroll up on a lengthy web page without actually swiping, you could just call up the AssistiveTouch menu, tap “Favorites,” and then the icon for your new “swipe down” gesture.
Now tap the screen, and it’ll obediently scroll down just as if you’d swiped it.
The “Siri” button will, as you probably guessed, activate the iPhone/iPad’s “intelligent assistant” without having to “long-press” the Home key.
And speaking of which, the AssistiveTouch feature has its own Home button, which does just what it says: it sends you straight to the iPhone’s home screen.
You can also double-tap the Home icon to reveal the iPhone’s multitasking bar at the bottom of the page (assuming you don’t want to both with AssistiveTouch’s dedicated Multitasking button).
Looking for more iPhone tips? Click here, or click here for help with your iPad.