Nope, you can’t remove Timeline—the chronological, comprehensive list of all your Facebook activity, starting from the very day you were born—from your Facebook profile, so you might as well make the most of it.
Indeed, you can customize both the look and the content of your Timeline to an almost obsessive degree.
For starters, you can change the “cover” photo that dominates the page, as well pick and choose your “About me” factoids, juggle your “favorites” tiles, and either highlight or hide specific Timeline posts.
Perhaps the most addictive Timeline pastime of all is adding and curating “Life Events,” such as moving to a new town, earning a degree, hitting your ideal weight, or any other pride-worthy personal milestone.
Read on for six ways to take charge of your Timeline, starting with…
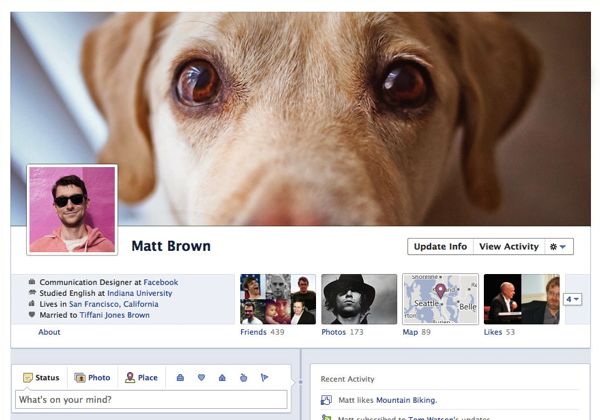
1. Add or edit your cover photo
The first thing that visitors to your Timeline will see is a big, bold image that dominates the page—your “cover,” a picture that “represents who you are or what you care about” (as Facebook puts it). Think of it as wallpaper for your Timeline, as opposed to a standard profile picture of your smiling (or not) mug.
To get started, click the “Add a Cover” button at the top of your Timeline page—or, if you already have a cover, hover over it with your mouse and click the “Change Cover” button that appears.

Changing your “cover” photo is an easy way to give your Timeline a whole new look.
You can either upload a new photo or choose an existing picture in one of your Facebook albums, and you’ll also get the chance to fiddle with the image so it’s framed to your satisfaction.
What you choose as your cover is up to you, of course, but keep in mind that your Timeline cover is public, meaning anyone (even non-Facebook users) will be able to see it.
And naturally, any change to your Timeline cover will also be posted in your news feed, although you can always hide or delete the post after the fact.
Don’t want the planet peeking at your cover photo? Then simply keep it blank.
2. Update your personal info
Just below your inset profile picture on your Timeline, you’ll find a series of little factoids about … well, you.

Just change the privacy settings on your “About” page to customize which bits of personal info appear on your Timeline.
For instance, the bullet points on my Timeline include a) my job title, b) where I went to school, c) where I live now, and d) the name of my better half.
Not happy with what you—or your Facebook friends—are seeing? Then click the little “About” link to jump to your personal information page, and click the “Edit” button at the top of any section you want to tweak.
Pay special attention to your privacy setting in the top-right corner of each section; by clicking those icons, you can determine which bits of personal info can be seen by everyone, just your Facebook friends, or only you.
All done? Go back to your main Timeline page to check the results.
You can also view your Timeline as others see it by clicking the settings button beneath your cover image (it’s over to the right, marked with a small gear icon) and selecting “View as.”
3. Rearrange your Favorites
Right next to your personal information sits a row of four tiles, which most likely include items like Friends, Photos, Map, and Likes, and just to the right of the fourth tile sits a small button stamped with a number.

You can juggle, add, or delete “Favorites” on your Timeline in just a few clicks.
Click the button, and you’ll reveal even more tiles—perhaps many more, depending on how many apps you’ve installed in your Facebook account.
These boxes are your Favorites, and you can (for the most part, anyway) mix and match them as you see fit.
Just hover your mouse over a tile and click the little pencil that appears to swap the position of one favorite with another, or to delete a favorite completely.
You can also add new favorites by click the “+” button on any blank tiles.
Two favorites that can’t be rearranged or deleted are Friends and Photos. That said, you can effectively remove Photos as a favorite by changing the privacy settings of your uploaded snapshots and hiding tagged photos of you from Timeline (just hover your mouse over a tagged picture, click the little pencil icon, then select “Hide from Timeline”).
And as far as your Friends list is concerned…
4. Change the visibility of your Friends list
While you can’t eliminate your Friends list from your Timeline favorites, you can hide it from the world—mostly, at least.
Click the Friends favorite tile, click the “Edit” button at the top of the main Friends page, then choose a new privacy setting from the pop-up that appears—anything from “Public” to “Only Me.”
One thing to keep in mind: even if you choose “Only Me” as your Friends list privacy setting, anyone who visits your Timeline will still see a Friends tile with any mutual friends the two of you happen to have. Yep, annoying, but that’s the way it is for now.
5. Hide, edit, or highlight Timeline stories
Scroll down below your cover photo and favorites and you’ll see the massive timeline of all your updates, wall posts, photos, and other Facebook events of note—including any messages, links or photos that your Facebook pals have posted on your wall (assuming you let them).
These are your Timeline “stories,” and they’re all neatly arranged in chronological order.

Just click the star to “highlight” a specific Timeline story.
See any stories you don’t like—say, a particularly unflattering photo that a friend tagged you in, or an annoying Farmville invite?
Or, on the flip side, are there any stories you want to highlight, such as your wedding photos, or congrats from your friends for that big promotion?
Whenever you see a Timeline story you want to promote, hide, or otherwise tweak, just hover your mouse over the story until you see the little “Edit” pencil appear.
Click it, and you’ll get a range of (varied) options; for example, you’ll may be able to hide an event from your Timeline, change its date, add a location, or delete the post altogether.
Keep in mind that the edit options vary depending on the post; for example, while you can hide a friend’s post in which you’ve been tagged, you won’t be able to delete it completely.
Some posts will also display a button marked with a star when you hover your mouse over them; click the “Feature” star to expand the item to fill both columns in your Timeline, perfect for highlighting, say, your new job, those ultra-cute snapshots of your toddler, or a litany of birthday wishes from your Facebook friends.
You can also shrink a “featured” Timeline story down to size by clicking the star button again.
6. Add some life events
A great way to make your Timeline your own is by adding so-called “life events”—anything from a trip abroad or buying a house to publishing a novel or losing weight.
To add a new life event, just click the “Life Event” button at the top of your Timeline, just below your cover photo and favorites. You’ll get a menu of options, from “Work & Education” to “Travel & Experiences,” with sub-options under each main heading. Pick the event that you’d like to add, or create your own by selecting the “Other Life Event” option.

Beware: Creating and curating your Timeline “life events” can be quite addicting.
You can change the privacy setting for any event you create, of course, as well as add a photo, a location, or tags for your friends. (For example, I went ahead and tagged my wife in the “life event” for our wedding.)
It’s also worth noting that Facebook will add certain life events to your Timeline automatically, including jobs and schools listed on your profile and even the very day you were born (yes, really).
For any of these automatic events, you can (usually) go ahead and add photos, change dates and details, or tweak their privacy settings.
With certain auto-events, though—such as the ones about your various jobs or the schools you’ve attended—you’ll have to dive back into your “About” page to adjust their privacy settings.
Looking for more Facebook tips? Click here!