It’s not unusual to see kids as young as 18 months interacting with tablets these days. In fact, my own children were obsessed with my iPad from very early on, and it led me to research what might be the best (and most affordable) tablet for kids. We settled on a Kindle Fire, for a variety of reasons, and we’ve never looked back.

Our family now has three Kindle Fires for the kids to use. With so many opportunities to incorporate entertainment and education into our daily lives, these devices have become a staple for streaming video, gaming, and even learning new languages.
The oldest kids use it for more serious gaming and ebook learning, while the toddlers have enjoyed many learning apps, including those that have helped them read, count, and draw. Some of my 6-year-old’s first words were in Chinese—something we only discovered after watching him interact with an engaging language app!
Buying electronics for kids can be daunting, however. Tablet needs must be balanced with value, durability, and what kids really like. That’s why the Kindle Fire has come out on top year after year as one of the best tablets for kids.
Bundled with an Amazon Prime account and FreeTime Unlimited (a treasure trove of kid-friendly videos, apps, and more), it can’t be beat for the price and features. Here’s everything you need to know to choose the right model and set it up for years of quality tech time with your child.
The Right Kindle Fire Tablet for Kids
The Kindle Fire currently comes in three models and a kids bundle. Here’s a quick look at each:
 Kindle Fire 7
Price: Starting at $49.99
The smallest and lightest of the Fire tablets, the Fire 7 features a seven-inch display, 8GB of storage (which you can expand with a microSD card), and best of all, a wallet-friendly $50 price tag (which regularly gets discounted to $40).
Want more internal storage? A 16GB version of the Fire 7 sells for $60.
 Kindle Fire HD 8
Price: Starting at $79.99
If you want something with a better screen and sound, you might want to snag this tablet. Starting at $79.99, the Fire HD 8 comes in either 16GB or 32GB storage capacities, and it also boasts 12 hours of battery life.
You’ll also get an upgraded display with 8 inches of HD (1280 x 800) resolution, and stereo speakers with Dolby-enhanced sound.
 Kindle Fire HD 10
Price: Starting at $229.99
For the biggest Kindle Fire screen yet, the Fire HD 10 is priced at $229.99. Available with up to 64GB of storage, the 10-inch Fire tablet features a much better front facing camera (720p HD vs. SD on other versions).
The Fire HD 10 is also the most grown-up looking version of the Kindle family, with a thinner design and the option for a premium silver finish.
 Kindle Fire Kids Edition
Price: Starting at $99.99
Amazon has made it almost too easy for parents to pick the right tablet for kids. They offer “Kids Edition” packs for both the Fire 7 and HD 8, priced at $99.99 and $129.99, respectively.
What do you get for the almost $50 price increase over buying the tablet à la carte? The Kids Editions include a kid-proof case, one year of FreeTime Unlimited service (which normally sells for $119 a year, or $83 if you’re a Prime member), and a two-year “worry proof” replacement and repair warranty.
In all honestly, we’ve done just fine with the standard Kindle Fire 7 and a case we bought for around $15 from a third-party Amazon seller. Kindle Fire tablets are not indestructible, but they’ve taken quite a few drops and spills in our rough-and-tumble household, so our family never bothered with the 2-year warranty.
Special Offers: What Are They?
When purchasing the stand-alone Kindle, you’ll find that you can only get the lowest price advertised by picking the “With Special Offers” version of the Kindle. What are Special Offers, exactly?
The bad news: they’re ads. The good news: the ads only show up as a screen saver between Kindle Fire sessions. Most Special Offers ads are for Amazon services, ebook launches, or household brand names we are all familiar with. Every Special Offers ad I’ve seen so far has been kid-friendly. Finally, ads never appear when the kids are in FreeTime mode on the Kindle.
Buying a Refurbished Kindle Fire
On a budget? Look for refurbished models of the Kindle Fire tablets. We’ve bought two refurbished Kindle Fire tablets ourselves, and couldn’t be happier. The savings were significant, allowing us to upgrade the storage capacity to the next level for the same price as the new, base model. For example, a refurbished 32GB Kindle Fire 10 is $30 cheaper than buying new, and it’s also the same price as a new 16GB Fire 10.
Refurbs sell out quickly, however. If you are in the market for one, check Amazon frequently to snag one while you can. (Woot.com has also entered into a partnership to sell refurbs from time to time.)
The Kindle Fire FreeTime Unlimited App
Fire tablets are incredibly durable and easy for little hands to use. The magic, though, is in Amazon’s FreeTime Unlimited service, which offers a world of parent-approved movies, games, apps, ebooks, and TV shows without the danger of accidental in-app purchases.
The app requires a $5/month subscription fee to access, or $3/month for Prime members. If you have more than one child, consider upgrading to the Family Plan, which allows each child in your home to have their own profiles for saved games, apps, and parental controls. A Family subscription goes for $10/month ($7/month for Prime members) or $119 annually ($83 with Prime). There’s also a one-month free trial if you’d like a sample before coughing up any dough.
Parental Controls
Here’s my favorite part of the Kindle and its accompanying Freetime app: the controls. Parents simply need a four-digit PIN to switch between the regular Kindle interface and the FreeTime app. Kids can’t switch between profiles without it.
Before allowing your kid to play, you have the option of setting time limits by day, restricted hours, and even content parameters. Don’t want your kid to play the latest Star Wars app before she has gotten in 20 minutes of ebook reading time? You can set that up! Simply set it up to lock them out after a set time.
Who is the Kindle For?
While we have allowed our younger children to use the Kindle for their games and apps, older kids will find it useful, as well. The FreeTime app gives parents the ability to filter content based on age, while also letting you add specific games, shows, books, and more as you dictate. If a child needs to read an ebook or play a math game for school, you can go outside the FreeTime realm and purchase it for your child. It is completely, and beautifully, flexible.
Common Kindle Issues
No tablet is perfect, and while we’ve only had a few issues with the Kindle Fire tablets we’ve owned, they can cause the fun and games to come to a screeching halt. No one wants to be on a crowded airplane when the baby’s beloved episode of “Yo Gabba Gabba” freezes and dies, so check out these must-read hacks.
- Estimate your storage needs. Unless your kids are very young, you have just one child using the tablet, or you are a master at managing storage by deleting silly kid-produced videos every day, you’ll want to go with at least 16GB of storage. Most apps don’t take much space, but after awhile, all those apps you’ve installed will start to add up.
- Clean up frequently. My toddler once took about 300 photos of the kitchen floor because he liked the sound of the camera made. You’ll want to keep tabs on junk that accumulates and delete it ASAP.
- Beware of lockouts. Kids should know the rules and not try to bypass your PIN for any reason. That said, you may find yourself locked out of your Kindle after 99 attempts of your toddler trying to guess the password. If that happens, don’t panic – the Amazon support team is very helpful. Keep them on speed dial for instances such as this.
The Family-Friendly Tablet
I’m always amazed at the mileage we get out of our Kindle Fire tablet. We’ve owned many Fire tablets over the years, and they have excellent battery life, they’re easy to use, and they deliver great bang for the buck. If you ask me, there is no better option for the money than the basic Fire 7 with upgraded storage.
If you’re shopping for a tablet for kids, keep your eyes open for one of Amazon’s frequent Fire sales (no pun intended). Also, bundle deals are a great way to stock up for holidays, birthdays, and graduation presents.
What type of tablet have you used with your children? What feature do they like the best?
Linsey Knerl is a freelance writer, mom of 6, and member of the ASJA specializing in parent and consumer news. You can find more of her work at LinseyKnerl.com or follow her on Twitter.
If you buy something through our buying guides, we may earn some money. Thanks for the support!
The post Buying Advice: The Ultimate Parent’s Guide to the Kindle Fire appeared first on here's the thing.
]]>[Updated February 20, 2018] Got an oversharing Facebook buddy who can’t stop with the food photos, a sullen friend who’s bringing you down with all his depressing updates, or a frenemy who you don’t want peeking at your Facebook photo albums? Well, you could always hit the “unfriend” button, but doing so might seem a bit extreme—and hey, what if they find out? Find out how to block someone on Facebook without them knowing, starting with…
1. Add chatterboxes to your “Acquaintances” list
So, you added a long-lost friend you remember fondly from high school, but they’re peppering your news feed with random links about their favorite TV shows, silly cat photos, and endless snapshots of their kids. It’s not that you want to slam the door on all their updates, mind you—just, well, most of them.
Here’s a quick, relatively painless solution: add your too-chatty friend to your Acquaintances list.

Once you do, Facebook will pare down the number of news feed updates you receive from them to a bare minimum. For example, you might still get notified that a far-flung Facebook acquaintance got married or landed a new job, but you’ll get sweet relief from the daily kitty snapshots.
Oh, and don’t worry: your friend will never know that you relegated them to your Acquaintance list.
To add a friend to your Acquaintance list on the Facebook web site:
- Hover your mouse over their name on their timeline or in your news feed.
- When you see the pop-up window with their profile photo and a “Friends” button, hover your mouse over the Friends button. Doing so will reveal a new pop-up menu, starting with “Get Notifications.”
- Select the “Acquaintances” option.
To add a friend to your Acquaintance list on Facebook for iPhone or Android:
- Tap the name of a friend in your news feed, tap the Friends button, then tap Edit Friends Lists.
- Tap Acquaintances, then tap Done.
Bonus tip: To hide a post of your own from the folks on your Acquaintances list, choose the “Friends except…” option from the audience selector (the pull-down menu that sits right next to the Post button). When you select “Friends except,” you’ll see a big list of all your friends, as well as a search field; type “Acquaintances” to select your entire Acquaintances list.
Related: 5 ways to keep hackers out of your Facebook account
2. Block downers from your news feed
Here’s another scenario: you have a pal who won’t stop with the links to depressing news stories, the “I hate my job” updates, the bitter political rants, and the off-color, not-so-funny jokes. You’re not quite ready to unfriend your bummer of a buddy, but you need a break from seeing their name in your Facebook news feed.
Well, guess what: you can completely block updates from that downer of a friend in just a few clicks.

To block the posts of a specific friend on Facebook for iPhone, Android or web:
- Click or tap the three-dot menu button in the top-right corner of a friend’s post; doing so will open a pop-up menu with a series of options.
- To permanently block the friend’s posts from your news feed, click or tap “Unfollow [name of friend].” Don’t worry—you can always follow an annoying friend again if you change your mind.
- If you only want to take a breather from a friend’s posts, tap “Snooze [name of friend] for 30 days.”
- Last but not least, enjoy the silence.
Related: Make your Facebook news feed default to “Most Recent” rather than “Top Stories”
Bonus tip: You can unfollow whole batches of friends using the Facebook app for Android and iOS. Tap the More button (in the bottom-right corner of the screen for iOS, or the top-right corner for Android), scroll down and tap News Feed Preferences (on Android) or Settings and then News Feed Preferences (on iOS), tap “Unfollow people to hide their posts,” then start tapping faces.
3. Banish a frenemy to your Facebook Restricted list
Say you foolishly added your conniving boss as a Facebook friend your first week on the job … and now you’re regretting it. You’re thinking twice about every photo upload and every update you post, but unfriending your boss isn’t an option. What to do?
Try this: put him or her on your Facebook “Restricted” list—a “friend list” for friends and frenemies who you’re this close to unfriending.
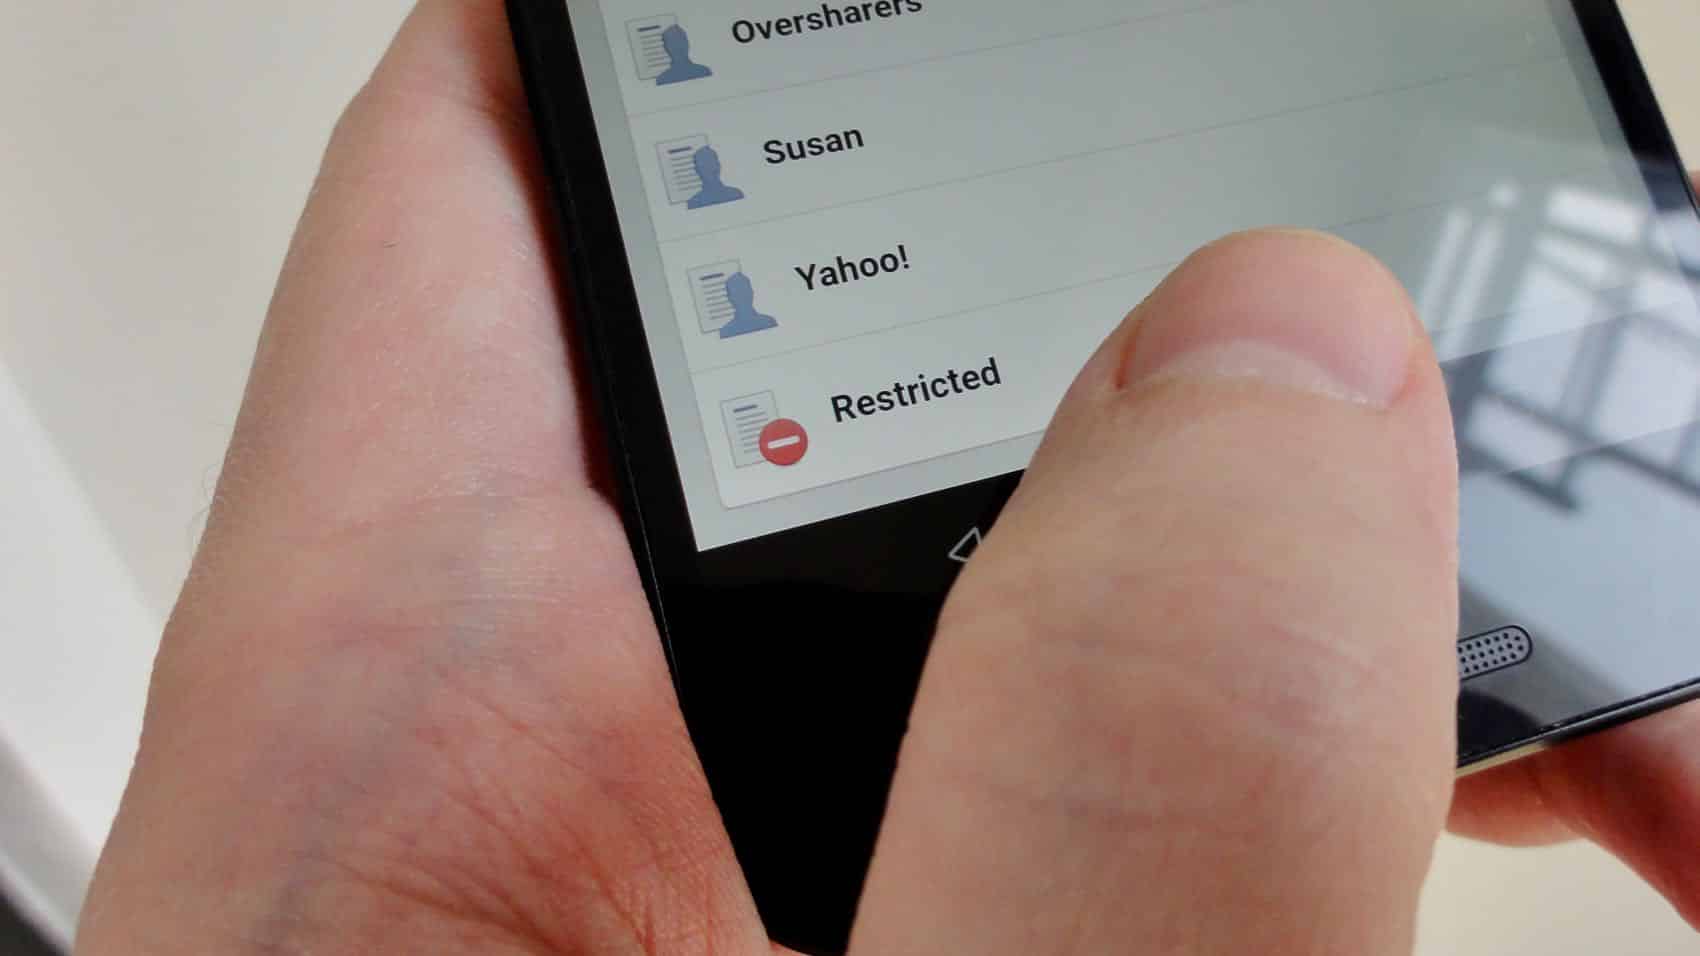
Once you banish someone to your Restricted list, they’ll no longer see any of your updates, photos, or other Facebook activity—or at least, nothing that you haven’t flagged as “Public” in your privacy settings.
In other words, putting a frenemy on your Facebook Restricted list is as close as you can get to unfriending someone without actually unfriending them.
To put a friend on your Restricted list on the Facebook website:
- Hover your mouse over their name in your news feed or on their timeline, wait for the pop-up window to appear, then click the Friends button.
- Scroll all the way down, then click Restricted.
To put a friend on your Restricted list on Facebook for iPhone:
- Tap a friend’s name in your friends list or on a post of theirs in your News Feed, tap the Friends button, then tap Take a Break.
- Under the Limit What [name of friend] Will See section, tap See Options, then tap “Hide your posts from [name of friend].” Doing so will put the friend on your Restricted list.
To put a friend on your Restricted list on Facebook for Android:
- Tap a friend’s name in your friends list or on a post of theirs in your News Feed, tap the Friends button, then tap Edit Friend List.
- Scroll all the way down, then tap Restricted.
Bonus tip: Want to see a list of all the friends whose posts you’ve blocked from your news feed? Go to your news feed, hover your mouse over the News Feed link in the top-left corner of the page, click the little gear icon, then click Edit Preferences. A pop-up window should appear with lists of friends who you’ve seen the most in the past week, along with a second list of unfollowed friends. Change your mind of any of them? Just click the “+ Follow” button next to a name.
Note: This article was originally published in February 2013, and has been updated and expanded to account for Facebook’s ever-changing privacy and sharing settings.
The post 3 ways to unfriend a Facebook friend without really unfriending them appeared first on here's the thing.
]]>The post iOS tip: How to forward iMessages or text messages via email appeared first on here's the thing.
]]>Hi Amro! Yes, there is a way to forward text messages or iMessages from your iPhone or iPad to an email address, but I warn you: it’s a bit clunky.
The method I’m about to explain will only forward the actual text in your message thread—meaning no date or time stamps, nor will there be any labels telling you who was “speaking” at any given time.
Oh, and if you want to forward a lengthy thread, prepare for a lot of tapping.
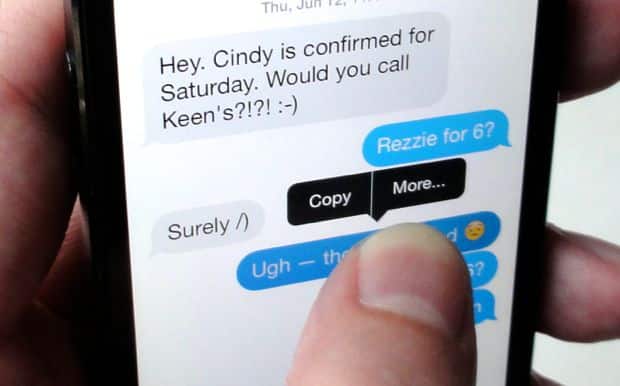
All set? Here we go…
- Open the Messages app, then open the thread with messages you’d like to forward.
- Tap and hold a message until a black bubble with “Copy” and “More…” buttons pops up, then tap “More.”
- A row a circles will appear on the left side of the screen, with each circle sitting next to an individual text or iMessage. Tap a circle to select a specific message, or tap them all to select the entire thread. (Sorry, folks—there’s no “Select All” button. Yep, I know.)
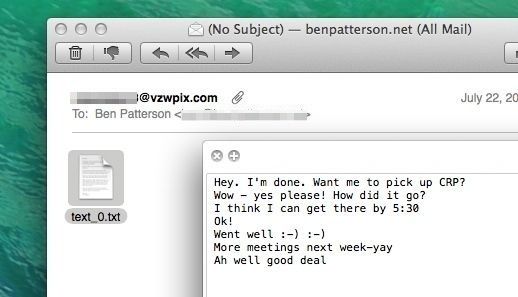
- Done selecting messages? Tap the little curly arrow in the bottom corner of the screen, then type in an email address into the “To:” form at the top. If you type in the email address for a contact in your iPhone’s or iPad’s address book, their address should appear as an auto-fill option as you type. Finished? Tap Send.
- The forwarded message should appear in the recipient’s email inbox as a “plain-text” email attachment. Also, keep in mind that the message itself will come from your carrier’s text-messaging service (complete with an email address like “[email protected]”) rather than from your regular email account. Just double-click the attachment to open it.
So no, not a perfect solution, Armo, but better than nothing. And if anyone else out there has a better idea, I’m all ears.
Note: You can only forward text messages to an email account with an iPhone or iPad with a cellular connection. If you try to forward text messages from, say, a Wi-Fi-only iPad, you’ll get an error message.
Bonus tips
- Just want to forward a few iMessages or text messages rather than an entire thread? You might be better off taking a screenshot of the messages and forwarding the image.
- Are you using the Messages app on the Mac? If so, you’ll find recent message threads stored in the Messages window, and you can copy and paste them quite easily. No, you still won’t get time stamps, but at least each message will be labeled with a name.
The post iOS tip: How to forward iMessages or text messages via email appeared first on here's the thing.
]]>The post Mac tip: How to stop programs from launching automatically appeared first on here's the thing.
]]>Now, some of these programs might be actually be ones that you do want to launch automatically, such as the Safari web browser, or Apple Mail. But other, not-so-necessary programs may be piling up in your Mac’s “login items” list, too—ones that set themselves to launch automatically without asking first.
Another factor that may be slowing down your system is the Mac’s “Resume” feature, which re-opens any and all apps you had running when you shut down your Mac. That could lead to a crush of apps all trying to launch themselves at startup.
Last but not least, you may have specific programs on your Mac with “Launch at Startup” settings that you’ll need to find and disable.
Now, if you’re the patient type, waiting a little longer for your Mac to boot up so that your programs appear just as you left them might be a fair trade-off.
But if you’d rather shave a few seconds—or even minutes—off the time it takes for your Mac to settle down after hitting the power button, read on.
1. Cross items off your Mac’s “Login Items” list
Your Mac launches a series of programs each and every time it starts up. Some of these programs are critical for the smooth operation of your system; others, not so much.
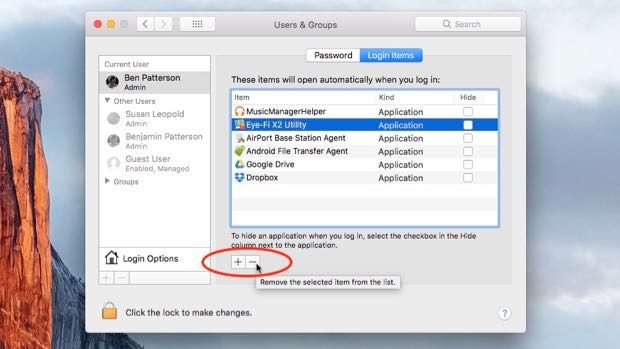
To see a list of all the programs your Mac opens automatically, click the Apple menu in the top-left corner of the screen, select System Preferences, click the “User & Groups” icon (it’s under the “System” heading), pick a user (you, most likely), and finally click the “Login Items” tab.
You should now see a list of everything your Mac is launching (or trying to launch, anyway) whenever it starts up.
Some of the items will be easy to identify—in my case, I’ve got Dropbox and Google Drive (the handy file-sharing apps) listed, as well as something called an “Eye-Fi Helper” (an app that lets my Mac receive wireless images from my digital camera) and “AirPort Base Station Agent” (which keeps tabs on my AirPort Wi-Fi base station).
To delete these or other startup items from the list (but not from your Mac, mind you), just select them and click the “-” button at the bottom of the list.
2. Keep “Resume” from re-launching previously open apps
Don’t get me wrong—”Resume” is one of the handiest Mac features, especially for those of us who like to pick up in Safari or the Calendar app right where we left off.
But if you don’t want Resume relentlessly re-launching all the apps you had open when you last shut down your Mac, you can stop it from doing so.
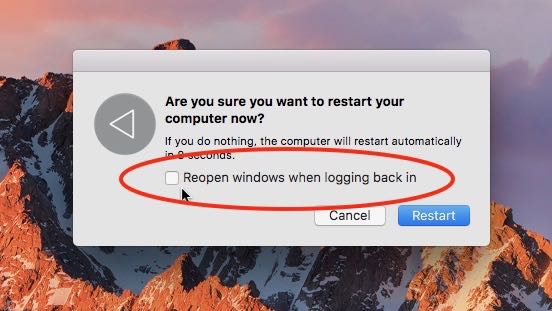
The next time you select Shut Down or Restart from the Apple menu, take a closer look at the window that pops up; in addition to the “Cancel” and “Shut Down” or “Restart” buttons, you’ll also see a checkbox labeled “Reopen windows when logging back in.”
Click the box to clear out the checkmark, and the only apps that’ll re-launch the next time your power on your Mac are those listed in the Login Items menu.
3. Check for program-specific “Launch at Startup” settings
So, you emptied the “Login Items” list and turned off the Resume feature, but there’s still a program that’s launching itself at startup. What gives? Well, it could be that the stubborn program has its own “Launch at Startup” setting.

Open the program, make sure it’s the active app on your desktop (just click its window if it isn’t), then find its Preferences menu; generally speaking, you’ll find it under its main menu in the Mac menu bar (like “Spotify” in the case of Spotify).
Once you’ve opened the program’s Preferences menu, look around for a “Launch at Startup” setting. If there are lots of different Preferences categories, start with “General,” then try “Advanced.” (In Spotify’s case, I found a “Open Spotify automatically after you log into the computer” setting under its “Advanced” settings.)
Found the “Launch at Startup” (or the equivalent) setting? Go ahead and disable it, then rinse and repeat for any other programs that are still launching themselves when you turn on your Mac.
The post Mac tip: How to stop programs from launching automatically appeared first on here's the thing.
]]>