Over time, your PC’s hard drive is bound to get more and more cluttered as Windows saves this bit of data here and another chunk of data there … until eventually, your data starts to looks like something out of an episode of “Hoarders.”
Now, keeping your hard drive all tidied up isn’t just a matter of filing everything away in nicely labeled folders. You’ll also need to occasionally run a special tool—the “Disk Defragmenter”—to help Windows pack the data in your hard drive as tightly as possible.
The Disk Defragmenter is a cinch to use. Just launch the app (you’ll find it sitting on your hard drive under Programs, Accessories, System Tools, or just search for it from the Start menu), click the “Analyze disk” button to find out how fragmented your hard drive is, then click “Defragment disk.”
The whole process can take anywhere from a few minutes to an hour or more, depending on the size of your hard drive and how long it’s been since it was last defragmented. That said, you can keep using your system while Disk Defragmenter does its thing in the background.
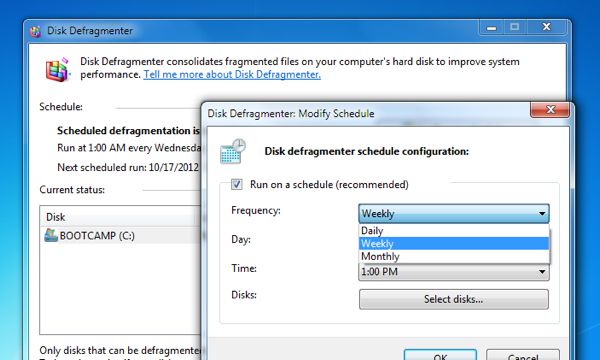
The real trick, of course, is remembering to defragment (or “defrag,” as techies say) your drive on a regular basis, which is why the app comes with its own, built-in scheduler. In other words, you can just set it and forget it.
The only problem with the scheduler is that by default, it’s set to run in the middle of the night. Now, if you leave your PC powered on 24/7, you’re good to go. If you shut your system down at the end of the day, though, it’s probably been weeks or months since Disk Defragmenter has had a chance to run itself.
My advice: set Disk Defragmenter to run automatically once a week, ideally during a time of day when your PC is likely to be on.
Here’s how to do it:
- First, let’s launch the Disk Defragmenter app. Open the Start menu, select “All Programs” near the bottom, click the Accessories folder, then System Tools, and finally Disk Defragmenter.
- Once Disk Defragmenter opens, go ahead and click the “Configure schedule” button.
- Make sure the “Run on a schedule” box is checked, then set up a defragmentation schedule that works for you. Under “Frequency,” I’d suggest selecting “Weekly”; then, pick a day of the week and a time when your PC is most likely powered up.
- Click the “Select disks” button to choose which hard drives to defragment, and make sure your main “C:” drive is checked off.
- Click the OK button.
Looking for more Windows tips? Click here!
