
Wish you could snap a screenshot on your Mac by tapping just the F5 key rather than tangling with the SHIFT + COMMAND + 3 keyboard combo?
Well, you can.
Just dig into the Mac’s Keyboard settings and you’ll find shortcut settings for dozens of features, from snapping screenshots and zooming the display to switching Mission Control desktops and revealing the desktop.
You can customize existing keyboard shortcuts, create new ones, and even take a shortcut from a rarely-used feature and give it to one you use all the time.
Just double-click an existing keyboard shortcut to replace it with a new one.
Here’s how…
- Click the Apple menu in the top-left corner of the screen, select System Preferences, click the Keyboard icon, then click the Keyboard Shortcuts tab.
- In the left column of the Keyboard Shortcuts window, you’ll find several different categories of shortcuts, from Launchpad & Dock to Application Shortcuts. Click a category, and a series of corresponding shortcuts will appear in the right column.
- See a shortcut you’d like to customize? Just double-click the current shortcut (make sure you double-click the actual shortcut rather than the name, or nothing will happen), then type in a new one. And don’t worry; you’ll get a warning if you try to enter a shortcut that’s already being used by another function.
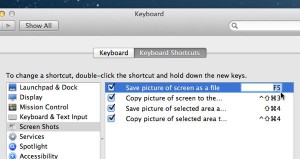
Make sense? Here an example: I wanted to change the shortcut for snapping a screenshot from SHIFT + COMMAND + 3 to just the F5 key.
First, I clicked Screen Shots in the left column, then I double-clicked the existing shortcut (which appears on-screen as ⇧⌘3), then pressed the F5 key.
And with that, I started taking screenshots by tapping just once key. Love it.
Bonus tip
Want to create custom shortcuts for your favorite programs? Easy.
Click Application Shortcuts in the Keyboard Shortcuts window, click the little “+” button just below the right column, pick a program from your Applications folder, type in a menu function, then type a shortcut.
Looking for more Mac tips? Click here!