
Read on for four gotta-try Windows Recycle Bin features, from making the recycle bin empty itself automatically to putting trashed files back where you got them.
1. Delete files from the Windows Recycle Bin immediately
When you toss a file in the recycle bin, it doesn’t actually get deleted right away. Instead, it’ll sit in the trash—and take up space on your hard drive—until you empty it manually or until it hits a preset limit (which I’ll cover in a moment).

Just change a single setting to make the Recycle Bin delete files the moment they’re trashed.
Of course, keeping trashed files on your system temporarily is a good idea in case you change your mind later. But if you’re positive you want to ditch a file right away, you can skip the recycle bin and delete it immediately.
One way to do it is to right-click it, hold down the SHIFT key, and then select “Delete” from the pop-up menu.
Want all the files you delete to be trashed permanently and skip the can? Right-click the recycle bin, select “Properties,” then click the “Don’t move files to the Recycle Bin” option.
2. Set a size limit
Let’s say you do want to temporarily keep deleted files in the recycle bin. That’s fine, so long as you remember to take out the trash once in a while. But who wants to bother with that? Me neither.

The recycle bin will empty itself automatically once you set a maximum size.
Well, you can always set a size limit for the recycle bin. Once the total size of your deleted items hits the limit, the recycle bin will automatically toss the oldest files.
Here’s how you do it:
- Right-click the recycle bin, then select “Properties.”
- Make sure the “Custom size” option is selected, then choose a maximum size—anything up to the total size of your hard drive.
- Click the “Apply” button, then click “OK” to close the settings window. You’re done!
3. Put trashed items back where you found them
So, you dumped a bunch of files in the recycle bin but you’re having second thoughts. Now what?
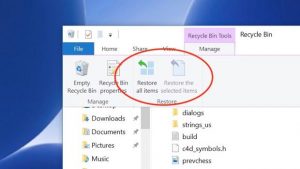
You can restore everything in the Recycle Bin to their rightful place with a single click.
You could just open the recycle bin, pluck the items out and drop them onto your desktop. A handy alternative, though, is to let Windows send the file back to its original location.
Just open the recycle bin, select the file you want to “un-delete,” click the Manage menu at the top of the recycle bin window, then click the “Restore the selected items” button. You can also click the “Restore all items” button to put everything in the recycle bin back where it was.
4. Hide the Windows Recycle Bin from your desktop
Don’t want the recycle bin icon cluttering up your desktop? You can hide it in just a few clicks.
Just check or uncheck the box to reveal—or hide—the Recycle Bin from your desktop.
Click the Windows button in the bottom-left corner of the screen, then click Settings (it’s the icon on the side that looks like a little gear), Personalization, Themes (look in the left column), scroll down to the Related Settings heading, then click “Desktop icon settings.”
Now, see the Recycle Bin checkbox? Uncheck it, then click the Apply button; once you do, the Recycle Bin icon will disappear from your desktop.
To get the Recycle Bin back (and remember, it’s not really gone, just hidden from your desktop), check the Recycle Bin box, then click Apply again.