That’s because your MacBook’s hard drive is probably packed with loads of personal information. Just think of all the email stored on your system, or the names and phone numbers in your address book. Ever do any online banking on your Mac? There’s a good chance your banking password is stored in your browser—along with a road map of all the sites you’ve visited recently. And let’s not forget any sensitive Word, Excel, or Quicken files sitting on your hard drive.
The good news? Mac OS X Lion, the just-released update to the Mac operating system, boasts a new-and-improved version of File Vault—an essential tool that will lock even the most determined thieves out of your Mac’s hard drive. Sure, they might have your MacBook in their greedy little hands, but they won’t be able to dig through all your files.
The new File Vault 2 utility cloaks your entire hard drive using what’s called 128-bit XTS-AES encryption—a cipher that’s devilishly difficult to crack.
And from a practical standpoint, File Vault is a cinch to activate and use. Just make sure not to lose your password and the last-ditch recovery code—if you do, and you haven’t asked Apple to keep your recovery key for you (more on that in a moment), you’ll be locked out of your hard drive forever.
Ready to get started? Then here we go:
1. First things first: back up your Mac before you proceed.
2. Next, you’ll need to have the administrator password for your Mac handy. The “administrator” is the main user of your system—most likely you—and the password you’ll need is the one you created when you first set up your Mac. Can’t remember your password? Follow these instructions to reset it.
3. Got your password? Then open the Security and Privacy preferences settings; click the Apple menu, select System Preferences, and click Security & Privacy.
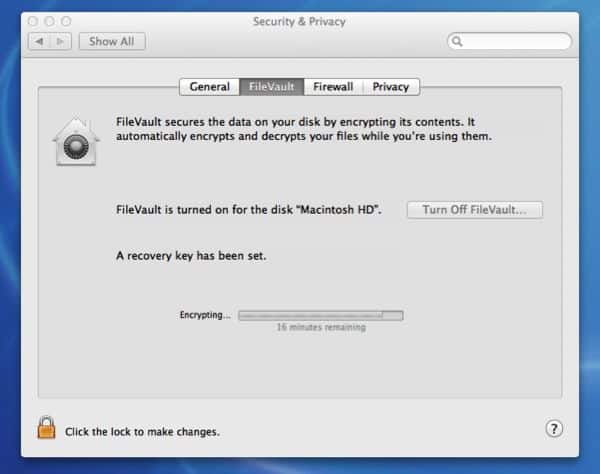
4. Click the FileVault tab, then click the “Turn On FileVault” button. Is the button grayed out? If so, click the locked padlock in the bottom-left corner of the window, and enter your administrator password.
5. Have any other user accounts on your Mac—for, say, a friend or a loved one? If so, you’ll be prompted to enter their user passwords.
6. Now, your Mac will give you a 24-character “safety net” recovery code, which you can use to unlock your Mac if you ever lose your password. Make sure to write down, copy, or otherwise save the recovery passcode and put it in a safe place—because once you lock your Mac with FileVault, it’ll be impossible to pry it open without your user password or the “safety net” code. (Tip: Don’t save the “safety net” passcode on the Mac you’ve locked with FileVault.) Once you’ve written your code down, click Continue.
7. You’ll now get the option of letting Apple keep an encrypted copy of your “safety net” code for you; if you say yes, you’ll be prompted to choose three security questions that you’d have to answer—precisely—before Apple gives you your passcode back. Choose (and answer) wisely.
8. Done? Click the “restart” button; FileVault will restart your Mac and begin encrypting your hard drive, a process that could take several hours.
The good news is that you’ll be able to keep using your Mac while FileVault is doing its thing, and you can even put your Mac to sleep or shut it down altogether; when you turn your Mac back on, File Vault will simply pick up where it left off.
Once File Vault is activated, any files you edit, create or transfer to your Mac will be automatically encrypted, on the fly.
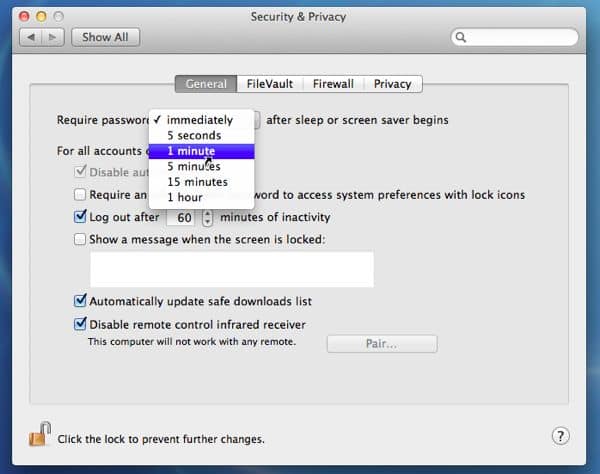
9. File Vault will turn password protection for all your Mac’s user accounts—and by default, you’ll need to enter your password the moment after your wake your Mac from its “sleep” mode. If you want a little more time, go back to Security & Privacy in the System Preferences, click the General tab, and select an option from the drop-down menu (anywhere from five seconds to an hour). Remember, though—the shorter the time period you select, the more secure your Mac will be.
Have more questions about File Vault, or Mac OS X Lion? Let me know!


Trackbacks/Pingbacks