
Caitlin writes: I love, love love my new MacBook Air, but it only just dawned on me that it doesn’t have a DVD drive. Do I need to buy another piece of hardware to play/open a DVD?
Hi Caitlin! Apple does, indeed, sell a so-called “SuperDrive” ($80) that’ll connect to your Air’s USB port, and there are also several third-party gadget manufacturers that offer MacBook-compatible CD/DVD optical drives for as little as $50.
You can share a DVD drive on a Mac or PC with an optical drive-less Mac thanks to the Remote Disc feature.
But here’s the thing: you don’t necessarily need to cough up more money just to access the occasional DVD- or CD-ROM.
The MacBook Air (as well as other optical drive-less Macs, such as the Mac Mini and the new “retina” MacBooks) comes with a feature called “Remote Disc,” which lets you wirelessly borrow the optical drive of almost any nearby Mac or PC.
If you want to share a Mac’s DVD drive, all you need to do is tweak a few settings. On the Windows side, you’ll need to download a small (and free) utility; once that’s done, though, the process is almost exactly the same as it is on a Mac.
It’s a nifty, money-saving feature, but there are a few of downsides:
- You can only access data CDs and DVDs that aren’t copy protected—in other words, no audio CDs or video DVDs, and no copy-protected game discs;
- You can’t burn a DVD or CD;
- Because Remote Disc works its magic over Wi-Fi, data transfers will be somewhat slower than they would over a USB-connected or built-in disk drive.
So, ready to open a DVD with Remote Disc? Let’s get started…

Just open the Sharing preferences panel to share your Mac’s DVD drive.
With two Macs:
- First, make sure your MacBook Air (or other drive-less Mac) and the Mac with the drive you’d like to share are both connected to the same local Wi-Fi network (like your home network).
- On the Mac with the optical drive, click the Apple menu, select System Preferences, then click the Sharing icon.
- Check the box marked “DVD or CD Sharing.” You may also want to check the box labeled “Ask before allowing others to use my DVD drive” if you’re sharing your drive over a public Wi-Fi network.
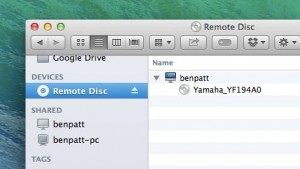
- Now, go to your MacBook Air, open a new Finder window (click the desktop, then click File, New Finder Window), then find and click Remote Disc in the sidebar (you should see it under the Devices heading).
- You should see a Mac icon labeled with a username (such as “benpatt,” in my case). Click the icon, and the name of any DVD or CD sitting in the remote Mac’s optical drive should appear.
- Click the remote drive (you may have to click “Ask to use” if the “Ask before allowing others to use my DVD drive” setting is enabled), and voilà—the contents of the disc should pop into view. Go ahead and double-click or drag-and-drop files as you normally would.

Yep, the Mac’s Remote Disc feature works on Windows PCs, too.
With a Mac and a PC:
- Want to borrow the optical drive on a Windows PC? No problem. First, you’ll need to install Apple’s “DVD or CD Sharing Update for Windows”; just visit this page, click the blue Download button, then follow the instructions.
- All set? Open the Windows Control Panel, click the Hardware and Sound heading, then click DVD or Sharing Options.
- Check the box labeled “Enable DVD or CD Sharing” (and, optionally, the “Ask me before allowing others to use my DVD drive” setting).
- Make sure both your PC and your Mac are connected to the same local Wi-Fi network, then insert a disk into your PC’s optical drive.
- From here, you can follow the same steps as above (starting with the fourth step) to remotely access the DVD or CD in your PC’s optical drive from your Mac.
Looking for more Mac tips? Click here!