
 Sarah writes: Hear that whimper? That’s me. I used Clean My Mac to improve performance. I also decided (late at night) to clean up desktop. There was a folder labeled Copy Library iPhoto and decided I didn’t need a copy of iPhoto, so I trashed it. Yep. 27,000 pics.
And before heading to bed I opened iPhoto for a specific photo. Nothing. Nada. Zippo. And of course I had emptied my trash. And of course my Lacie external crashed 2 weeks ago.
I am just sick. Please yell at me for all the stupidity, but then…is there hope?
Hi Sarah! Before you totally panic, consider this: you may have just switched iPhoto libraries by mistake. Open iPhoto, click the File menu, select “Switch to Library,” and see if can switch back to your old iPhoto library.
Nothing there? If not…well, I hate to say it, but it doesn’t sound good, especially since it sounds like you don’t have a backup of all those photos.
The good news (if there is any) is that even after emptying your Mac’s trash bin, the files you deleted aren’t necessarily gone forever.
Sure, there are data-recovery programs that can (maybe) retrieve deleted files, but nothing beats a fresh Time Machine backup.
As this Cult of Mac article points out, your Mac doesn’t immediately wipe trashed files off your hard drive; instead, the disk space that was occupied by those files is simply marked as available for new data.
That means if your Mac hasn’t done much file juggling since you trashed all those photos, there’s a possibility that at least some of your snapshots are still sitting on your hard drive, waiting to be recovered.
The only problem, though, is that recovering them isn’t that easy. Cult of Mac ticks off a couple third-party programs that might do the trick, but they both require a certain amount of expertise, patience, and luck—not to mention a fair amount of cash (anywhere between $80 and $100).
There are also plenty of hard-drive recovery companies (such as DriveSavers and SalvageData) that’ll take your Mac and do the dirty work for you, but again, their services don’t come cheap—although if you really, really want your 27,000 photos back, they might be your best option.
Of course, the very best way to keep your photos and everything else on your hard drive safe (although it’s a little too late in your case, Sarah) is to back up your Mac on a regular basis.
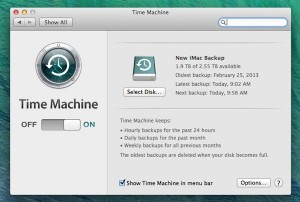
The Mac has an excellent built-in backup utility, called Time Machine, that’ll silently back up your hard drive on an hourly basis.
All you need to do is buy and connect an external hard drive (you can get a massive two-terabyte hard drive for about $100 or so), then launch Time Machine and follow the steps. (I have an old Time Machine tutorial right here that’ll give you a general idea of how the process works.)
Apple also sells a somewhat pricey ($300—ouch) Wi-Fi-enabled Time Capsule base station for MacBook users who prefer wireless Time Machine backups. That said, you can always save some cash (like I did) on a portable, sub-$100 hard drive that you connect to your Mac every few days or so.
With Time Machine up and running, you can always go back and recover an old file or folder that you thoughtlessly deleted.
And if the worst happens—for example, if your entire hard drive gives up the ghost—you can use Time Machine to restore all your data, right down to your Mac’s system preferences and even its wallpaper.
Hope that helps (at least a little bit), Sarah. Still have questions? Let me know!