
So, wait—is Chicago just an hour behind New York, or is it two hours behind? No matter how often I check, I still can’t get it straight.
Luckily, help is at hand, all thanks to the humble little clock on your Windows desktop.
As it turns out, you can add one or two additional clocks to the main Windows clock—you know, the one that sits in the toolbar.
Once you’ve added the new world clocks, you can reveal the current time for each clock in a small window by hovering your mouse over the taskbar clock.
You can add one or two more clocks to the standard Windows clock; just pick a time zone and a label.
Want larger clocks with ticking hands, all in a row—you know, just like those time-zone clocks that hang on a wall? Just click the taskbar clock rather than merely hovering your mouse over it.
Sound good? If so, here’s how to customize your new clocks…
- Right-click the clock in the taskbar, then select “Change date and time settings.”
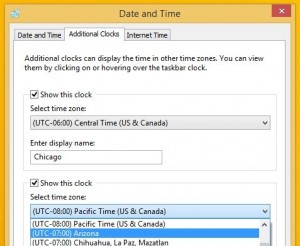
- Click the “Additional Click” tab, then check the box next to the first “Show this clock” section.
- Under “Select time zone,” pick the time zone that you’d like displayed.
- Label your clock in the “Enter display name” feature—say, “Mountain Time” or “Chicago.”
- Rinse and repeat for the second clock.
- Click the OK button at the bottom of the window.
Now, click the clock, and a window will appear with three clock faces: one with your time, and two more with the clocks you just customized. And no, unfortunately, you can’t add more than two additional clocks.