No “Live” photos, 3D Touch or Face ID? Me neither, and indeed, compared to the all-screen iPhone X or the lightning fast iPhone 8, my old iPhone 6 is looking decidedly long in the tooth.
The good news, though, is that some of the best new features in iOS 11—from one-handed typing to the ability to quickly scan receipts—will still work on older iPhones and iPads, including the iPhone 6 (circa 2014), the iPhone 5S (from 2013) or even the four-year-old iPad Air. (Click here to see exactly which iPhones and iPads are compatible with iOS 11.)
Read on for 6 new iOS 11 tricks that’ll work on your older iPhone or iPad, starting with…
Scanning QR codes
QR codes—you know, those blocky-looking digital squares that, when scanned, generally refer you to a URL—aren’t quite as ubiquitous as they used to be (although according to some, QR codes are on the way back). However, you’ll still occasionally find them stamped on billboards, magazine ads, movie posters, and other random places.


Thanks to iOS 11, the iPhone’s camera now boasts a built-in QR code scanner.
Until recently, the only way to scan a QR code using your iPhone was with a third-party QR scanner app. With the arrival of iOS 11, though, scanning a QR code with your iPhone or iPad has become much easier.
Instead of scouring the App Store for a QR reader, just fire up your iPhone’s camera and point the camera lens at the QR code. Within a second or so, a “Website QR Code” notification should appear, prompting you to open the URL the code is referring to.
Related: 4 ways to take charge of the new iOS 11 Control Center
Getting help in an emergency
If you’re in distress and you’ve got your iPhone on you, there’s a new and easy way to call an ambulance or the police, assuming you’ve updated your handset to iOS 11.
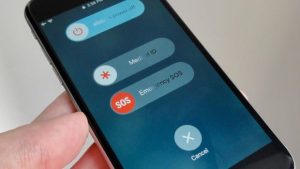
Need to dial 9-1-1? Just click the iPhone’s power button rapidly five times.
The trick: click your iPhone’s power button five times in quick succession. When you do, a trio of sliders will appear on your iPhone’s lock screen: swiping the first will turn off your phone, the second will call up your Medical ID information (which you can fill out in the iOS Health app), while the third and final one will dial 9-1-1.
If you wish, you can add one or more “emergency contacts” who will automatically be notified if you make an emergency call on your iPhone. To do so, launch the iOS Health app, tap the Medical ID tab, tap Edit, scroll down to the Emergency Contacts section, then tap the green “+” button to start adding contacts.
Last but not least, you can set your iPhone to automatically dial 9-1-1 the moment you click the power button five times. Tap Settings, Emergency SOS, then switch on the Auto Call setting. Of course, you might want to think twice about enabling the Auto Call setting if you’ve got an iPhone-obsessed little one.
Scanning receipts or other documents
I’m a little obsessive-compulsive when it comes to saving my receipts, but I also hate littering my desk with little scraps of paper. That’s why I’ve been scanning all my receipts with my iPhone, but until recently, I’ve had to use a third-party scanning app (Scanbot, in my case).

The Notes app for iOS 11 makes it easy to scan receipts and other documents.
With iOS 11, though, your iPhone or iPad—and yes, even an older one—can scan receipts and other documents without the help of a non-Apple app.
Just open the Notes app, start a new note or open an existing one, tap the “+” button at the bottom of the screen, then tap Scan Documents.
Next, aim your iPhone’s (or iPad’s) camera lens at the document you want to scan. Once the Notes app “sees” the document, it’ll automatically snap a photo and crop the image. You can then tap the Action button (the square one with the upward arrow) to save the scan to your device or your favorite cloud-based service (like iCloud Drive, Dropbox or Google Drive).
Related: How to mark up a web page in Safari for iOS 11
Typing on your iPhone with one hand
I’m still disappointed that the stock iOS keyboard has yet to support gesture typing, which lets you type words by swiping the keyboard rather than tapping it.
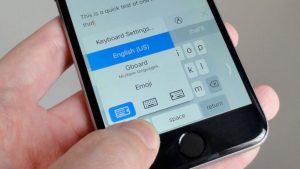
Wish it were easier to type on your iPhone with one hand? Just enable iOS 11’s new one-handed typing feature.
With iOS 11, though, Apple has at least embraced one-handed typing—a feature that squishes the keyboard to the left side or the right, making it easier to typing with a single thumb.
To start typing with one hand, open the iOS keyboard (just open any app that supports the keyboard, or tug down on the iOS home screen to reveal the Spotlight search box), then press and hold the globe key or the emoji key. (Don’t see either? Tap Settings, General, Keyboard, Keyboards, then make sure there are at least two different keyboards listed. If they’re aren’t, tap Add New Keyboard to add one.)
Once you press and hold the globe or emoji button, a Keyboard Settings pop-up will appear, and at the bottom, you’ll see a trio of little keyboard buttons. Tap the left one to squish the keyboard to the left, tap the right one to make it scoot to the right, or tap the center button to return the keyboard to two-handed mode.
Easily typing numbers and symbols on the iPad’s keypad
While the iPad lacks the iPhone’s one-handed mode in iOS 11 (although who needs it, given that you can split the keyboard), it gets another keypad-oriented feature that’s among my favorite iOS 11 improvements.

Just flick a letter key to type a number or a symbol on the iPad’s new QuickType keyboard for iOS 11.
The new “QuickType” keyboard boasts shortcuts to numbers and symbols on the standard letter keys, and it lets you type a number or a symbol by simply swiping down on the appropriate letter key, no Shift key required. That means, for example, you can swipe down on the “Q” key to type the number 1. Pretty neat, once you get the hang of it.
Related: 3 things to know about the new iPad dock in iOS 11
Sharing your Wi-Fi passwords
So, let’s say a friend is visiting you at home, they’ve got no cellular signal on their iPhone and they ask if they can jump on your Wi-Fi network for a minute.

Want to share your Wi-Fi password with a friend? Just open your Wi-Fi settings and bring your iOS devices close together.
Normally, you’d have to go through the business of digging up your Wi-Fi password and reading it to them, one digit at a time—a tedious chore, particularly if you’ve created a strong Wi-Fi password (as you should).
Thanks to iOS 11, though, you can now quickly share your Wi-Fi password with any of your iPhone- or iPad-toting friends, provided they’re nearby and listed in your iOS contacts.
First, make sure your iOS device is connected to the Wi-Fi network you want to share. Next, ask your friend to open their iOS Wi-Fi settings (tap Settings, Wi-Fi) and tap the name of your Wi-Fi network. When they do, iOS will prompt them for your password.
Now, move your iPhone or iPad near their iOS device. With a second or so, a prompt asking whether you want to share your password should appear. Just tap the “Share Password” button to proceed.