
 So, what’s the big deal about Instagram, you ask? Well, it’s not just a smartphone app for adding eye-popping color filters and blur effects to your photos.
Above all, Instagram is about sharing your latest snapshots with friends, other Instagram users, and yes, the world.
But what if you’re not feeling the need to show off your Instagram-dipped photos to … you know, everyone?
Luckily, it’s easy to control exactly who does—and doesn’t—get to see your latest works of digital photo art.
Read on for a few beginner-focused tips on how to get the most out of Instagram without becoming an exhibitionist in the process.
1. Change the privacy setting for your photo feed
Taking a photo with Instagram (available here at the Apple App Store, or here from Google Play) doesn’t just save the image to your phone’s photo gallery. It also publishes your snapshot to your Instagram photo feed—which, by default, is wide open to anyone who cares to look.
Want to keep just anyone from following your Instagram photos? No problem.
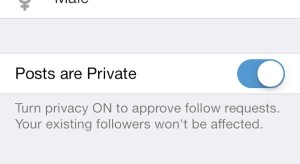
Don’t want just anyone gawking at your Instagram pictures? If not, just turn on “Private Mode,” which blocks your Instagram photo feed from everyone except your hand-picked “followers.”
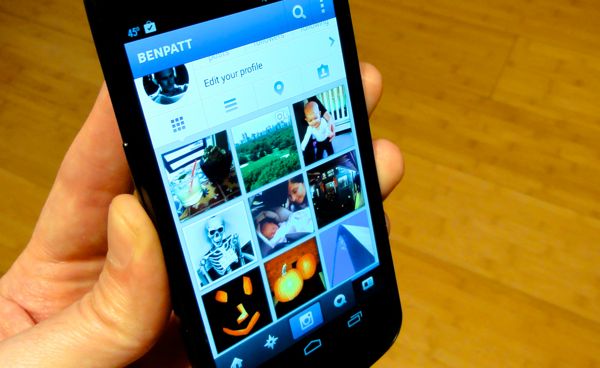
- Tap the profile button in the bottom-left corner of the Instagram interface, then tap “Edit your profile.”
- Scroll down to the “Posts are Private” setting and flip the switch (or, on Android, check the box) to “On.”
All done? If so, your Instagram photos are no longer accessible to the public, nor will they show up in public searches.
Of course, all bets are off if you decide to share your Instagram shots on Facebook or Twitter, so make sure to double-check which social services are selected on the final confirmation page before tapping the “Share” button (or, in the case of Android, the blue button with the checkmark).
Speaking of which…
2. Double-check your Facebook sharing settings
Instagram makes for an easy-as-pie way to share your latest photos with your Facebook friends. Here’s a question, though: when you share Instagram photos through Facebook (which you can do by tapping the Facebook setting on the final confirmation page before posting a photo to your feed), who are your photos being shared with?
You can tweak your privacy settings to determine who gets to see your Instagram photos on Facebook—and who doesn’t.
Well, there’s an easy way to check exactly how Instagram is sharing your snapshots on Facebook.
- Visit your Facebook account, click the Settings icon (the one shaped like a gear) in the top-right corner of the page, select Account Settings, then click Apps in the left column.
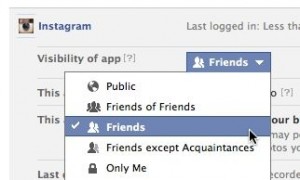
- Find Instagram in the “Apps your use” section (assuming you’ve already connected Instagram to your Facebook account), click Edit, then check the setting that’s selected next to “Visibility of app.”
- Want to change the privacy setting? Just select a new one from the pull-down menu.
3. Block random followers
As with Twitter, anyone on Instagram can follow the photo feed of anyone else—including you—unless their profiles are set to “private.”
You can block any of your existing Instagram followers in just a few taps.
Let’s say, though, that a few strangers managed to follow your Instagram photos before you set your account to private mode. Now what?
If you don’t want randow followers checking out your snapshots, you can always just block them.
- First, head to your profile by tapping the profile button in the bottom-right corner of the screen.
- Now, see where your number of Instagram followers is listed? Tap the number, and you’ll arrive at a list of all the Instagram users following your photo feed.
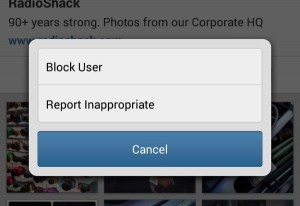
- See anyone you don’t want thumbing through your photos? Tap their name to view their profile, then tap the menu button in the top-right corner of the screen.
- A pop-up window will appear with a few options, including “Block User.” Tap “Block User,” and clang! No more peeking at your Instagram photos for them.
4. Edit your profile
Your fellow Instagram users (well, the ones you don’t already know in real life, anyway) only know as much about you as you reveal in your Instagram profile.
Indeed, the only detail you need to reveal in your profile is your Instagram user name—which could be anything, really.
To edit your profile, tap the profile button in the bottom-right corner of the page, tap the Edit Your Profile button, then add—or delete—any personal details you like.
5. Wipe photos off Instagram’s photo map
Instagram boasts a nifty feature that pins any photos you choose to a “photo map” that’s viewable from your profile.
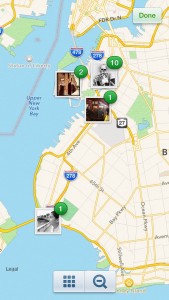
You can pick and choose which of your Instagram photos appear on your Photo Map.
Snap the vista from, say, the top of the Empire State Building, and other Instagram users will see it pinned to a map of midtown Manhattan, if you so choose.
It’s a neat feature for showing your friends where you trekked on your vacation, but you might want to think twice before sharing your home address—or the location of your friends’ homes, for that matter.
Before sharing a photo on Instagram, take note of the “Add to your Photo Map” setting on the final confirmation page, then ask yourself: do you really want the location of your photo pinpointed on a map?
If not, make sure the “Add to your Photo Map” setting is switch “Off” (on iOS) or unchecked (on Android).
OK, but what if you’ve already posted a stack of Instagram photos on your photo map? Never fear. Here’s how to peel them off.
- Tap the profile button in the bottom-right corner of the screen, tap the Photo Map tab (it’s the teardrop-shaped icon) on your profile page, then tap the Edit button in the top-right corner of your Photo Map.
- Zoom in and tap a specific photo you’d like to wipe off your Photo Map, or tap the grid button at the bottom of the screen to pick and zap some or all your Instagram photos off your map at once.
Note: Have you set your Instagram photos to “private”? If so, no one else but you can see your photo map, not even your followers.
6. Delete photos from your photo feed
Did you take and share a photo on Instagram that, on second thought, you wish you hadn’t?
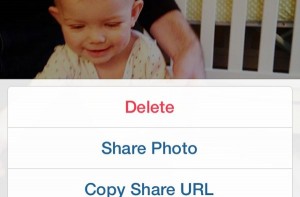
Want to delete a photo from your Instagram feed? Easy.
No, you can’t make your Instagram followers “unsee” a photo (oh, if only you could), but you can delete it from your photo feed even after you’ve shared it.
- Tap the profile button in the bottom-right corner of the screen.
- Below your profile details, you should see all the photos you’ve shared in Instagram. If your photos are displayed in a grid, tap one to select it; otherwise, just scroll to the photo you want to delete.
- Just below the photo and over to the right, you’ll see a little menu button marked with three dots; tap the button, and a pop-up will appear with a series of options, including a “Delete” button. Tap “Delete,” and whoosh—your photo’s gone from your Instagram photo feed, if not from the memories of your followers.
7. Share photos only with specific Instagram followers
Just snap a pic that you’d like only a few of your Instagram followers to see? Well, you’re in luck.
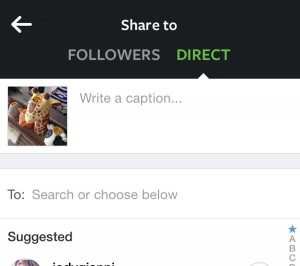
You can choose specific Instagram followers with whom you’d like to share a given photo.
A relatively new feature called “Instagram Direct” lets you pick and choose which Instagram pals can see your latest snapshot.
Just take a new photo using the Instagram app, then tap the “Direct” tab when you arrive at the final confirmation page.
When you do, you’ll see a list of all your Instagram followers; just scroll down and select the ones with whom you’d like to share the photo.
Have more Instagram questions, or any tips to share? Post ‘em in the comments below.
Note: This updated and expanded tip was first published in August 2012.


