Tired of your various Mac apps winding up in the wrong virtual desktop? I know the feeling.
Well, good news. You can, in fact, assign an app to a specific desktop in Mission Control—perfect for keeping your programs in their proper “spaces,” particularly when you’re booting up your Mac.
Before we begin, something to keep in mind: this trick applies only to apps running in standard “windowed” mode. Programs running in “full screen” (a handy new feature in Mac OS X “Lion”) automatically get assigned to their own desktops.
Related: Getting the hang of desktop “spaces” in Mission Control

Just select “This Desktop” to pin an app to a specific Mission Control desktop.
So, ready to start “pinning” your apps to specific desktops? Here we go…
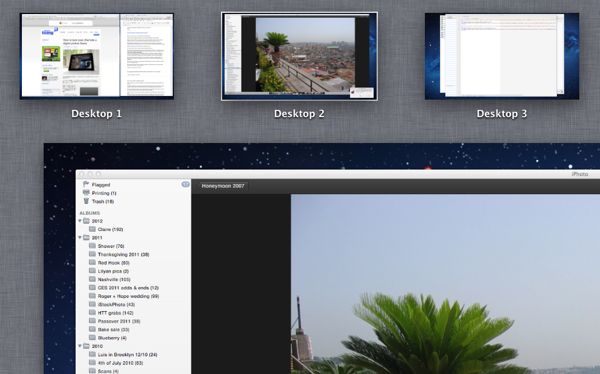
- First, navigate to the desktop where you’d like a particular program to call home. If, for example, you want iPhone to sit in Desktop 2, launch Mission Control, then click on Desktop 2 from the overhead Mission Control view (or create a second desktop if there isn’t one already).
- Launch the app you want to assign to the desktop—again, let’s use iPhoto as our example.
- Go down to the Mac desktop dock at the bottom of the screen, find the icon for iPhoto, and right-click it.
- In the menu that appears, select Options, then select “This Desktop” under the “Assign to” heading.
Now, let’s test. Go ahead and close the app you just assigned to a desktop, navigate to Desktop 1 in Mission Control, then launch the app again—and when you do, it should launch in the desktop you assigned it to.
Also, if the app you’ve pinned to a desktop opens automatically when you start up your Mac, the app will now launch in its assigned window.
Related: How to rearrange your Mission Control desktops
OK, but what if you want to “unpin” an app from a desktop? Just right-click its icon in the dock, select Options, then select “None” under “Assign to.”
Looking for more Mac tips? Click here!
is there any way to pin the terminal to all desktops? I’ve been looking for this feature ever since I got on a mac, which was like 2 weeks ago, and have yet to find it