Even the most reliable desktops and laptops (Macs included) depend on hard drives for storing all your precious photos, music, email, and other personal files—and most hard drives still consist of moving parts that will, eventually, begin to wear out or even seize up altogether.
So, what’ll happen to all your precious music, photos, home videos, and other personal files when your hard drive finally conks out? (And it will, eventually.) One word: poof.
And even if your hard drive doesn’t fail you, consider this: what would happen if, say, you left your MacBook on a plane by mistake? Or someone (gulp) stole it? Yes, your hardware would be gone; worse, though, your personal files would be missing, perhaps lost forever.
Having a recent backup of your entire system will save you the heartache of a failed hard drive or a stolen computer—and the good news for Mac users is that Apple’s own backup utility, called Time Machine, couldn’t be easier to set up and use.
What you’ll need:
- An iMac or MacBook running Mac OS X version 10.5 or better. You can check the version of Apple’s system software that your Mac is using by clicking the Apple menu in the top-left corner of the screen and selecting “About this Mac.” Keep in mind, though, that any iMac or MacBook sold since fall 2007 should already have Mac OS X 10.5 (or better) installed.
- The Mac OS X install disk that came with your Mac. You’ll find it in your original iMac or MacBook box, along with your system manuals and other pamphlets. You won’t need the disk right away, but you will need it in case you ever need to restore your entire hard drive, so keep it handy.
- An external USB 2.0 hard drive. You can find plenty of them on Amazon and other online stores, and I recommend buying one that a) is Mac-compatible (all hard drives are, really, but so-called “Mac-compatible” drives have already been formatted for the Mac operating system, saving you the hassle) and b) at least as large as the hard drive in your iMac or MacBook. (To find out how large the hard drive is on your Mac, right-click the main hard drive icon on your desktop, select “Get Info,” and look for “Capacity” in the window that opens.)
Also, if you’re buying an backup drive for a MacBook, consider a portable drive that draws power from its USB cable—meaning no need for a separate AC adapter. Portable hard drives are incredibly handy, especially for backing up a laptop; keep in mind, however, that they’re pricier than larger desktop external drives with individual AC plugs (which may be the best choice for desktop iMac systems).
Now, what follows may look a little intimidating—a huge list of steps, right? But don’t worry. The Time Machine backup process is incredibly easy, especially once it’s all set up. This won’t hurt a bit.
OK … so you have your hard drive ready and your Mac powered on. Ready to begin? Let’s get started!
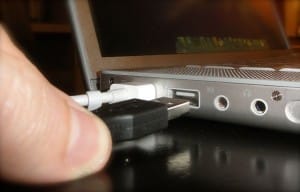
First, plug your new hard drive into a free USB port on your Mac (look along the side if you have a MacBook, or in back for iMacs). It’ll whir for a few seconds as your Mac scans its contents, and then an icon for your backup drive will appear on your desktop.
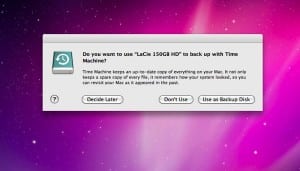
- After a few more seconds, a pop-up window will appear, reading “Do you want to use [the name of your new hard drive] to back up with Time Machine?” Click the “Use as Backup Disk” button.
- Next, the Time Machine control panel will open … and now, you can pretty much relax, as your Mac will begin to back itself up to your external drive after a two-minute countdown.
Once the actual backing-up process begins, you should prepare to hurry up and wait. Because Time Machine is backing up all your files for the first time, the entire process could take anywhere from 30 minutes to several hours, depending on how much music, video, photos, and other files are sitting on your hard drive. The good news, though, is that subsequent backups will be much faster, as Time Machine will only be looking for data that’s changed since the previous backup.
- While you’re waiting for the first backup to finish, check out out some of the available options. For example: If you want to see what Time Machine is up to without opening its control panel under System Preferences (which you can find at any time under the Apple menu in the top-left corner of the screen), check the “Show Time Machine status in the menu bar” box. My recommendation: go ahead and check the box.
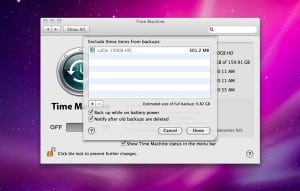
You can also—if you wish—specify specific folders on your Mac that you don’t want Time Machine to back up. (Personally, I don’t bother with this setting, but it may come in handy in some cases—particularly if you have additional hard drives besides a backup drive connected to your Mac.) Click the “Options” button, the click the little “+” box beneath the window of excluded directories (you’ll notice that your backup drive is already listed). Now, find and select and folders or external hard drives that you’d rather have Time Machine go ahead and skip.
Two more options you’ll find under the “Options” button: one that lets Time Machine run even when your MacBook isn’t plugged into a wall outlet (personally, I suggest you leave this box unchecked), and another that will alert you if your backup drive gets full and old Time Machine backs need to be deleted (check the box, I say).
- When your first backup is finally finished, the little spinning Time Machine icon at the top of the screen will stop … and that’s it! From now on, Time Machine will back up your Mac every hour, so long as your backup drive is connected.
So, now you have Time Machine up and running. What are the best ways to use it on a day-to-day basis?
If you have an iMac, I recommend keeping your backup drive connected all the time. That way, you can pretty much forget about Time Machine—it will keep backing up your Mac every hour, whenever your Mac is powered on.
If you have a MacBook, it probably isn’t feasible to have a backup drive—even a smaller, portable one—connected all the time. Instead. keep your new drive somewhere handy (I have mine tucked away in a nearby closet) and try connecting it once a day or so, whenever you know you’ll be working (or relaxing) with your MacBook for at least a half-hour.
And remember—the more often your back up your Mac with Time Machine, the faster each “incremental” backup will go.
Now: Let’s say something bad happens. Maybe you deleted a file you didn’t mean to—or, worse yet, you Mac refuses to boot up, and clerks at the Apple Store shake their heads sadly and tell you your main hard drive has given up the ghost. Now what?
If you need to retrieve a single file…
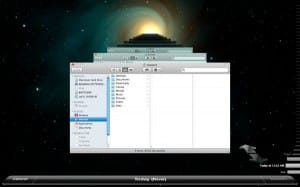
Open Time Machine in your Applications folder, or by clicking the green Time Machine icon in your desktop dock; when you do, your entire desktop will slide away and a window for your main hard drive will appear—complete with several (or even dozens) of similar windows all lined up behind the first, stretching back into what looks to be the Milky Way galaxy. Weird, right?

So, let’s say there was a photo on your desktop that you accidentally deleted, just now. With Time Machine, you can essentially … well, go back in time and snatch it back.
- Move your mouse to the column of white notches along the side of the screen; as you do, the notches should stretch out, revealing labels with dates and times.
- Just click a notch from, say, an hour ago, and if your missing photo was sitting on your desktop at that moment, you’ll see it sitting there again, just as it was.
- Select the photo, and click the “Restore” button in the bottom-right corner of the screen.
- Presto! The photo will be back on your present-day desktop, rescued from oblivion.
If you need to restore your entire hard drive…
OK, so say the hard drive on your iMac up and died—or, scarier yet, you left your MacBook at Starbucks and someone made off with it.
In those nightmare scenarios, the good news is that you’ve been keeping regular backups with Time Machine, and not all is lost. Once you get a new hard drive for your Mac—or a new system altogether—you can restore your backed-up files with Time Machine.
- Connect your Time Machine backup drive to your new (or repaired) Mac.
- Next, power on your system, then insert the Mac OS X installation disk that came with your iMac or MacBook.
- After a moment or two, an icon that reads “Install Mac OS X” should appear on your desktop. Double-click it, then click the Utilities button at the bottom of the pop-up window; you’ll then be prompted to restart your Mac by clicking the Restart button.
- Once your system restarts, you’ll be asked to pick a startup language; don’t worry just click the language of your choice, and move on.
- You’ll then arrive at a window that reads: “Install Mac OS X.” Now, look at the menu bar at the top of the screen; see where it says “Utilities”? Click that, then select “Restore System from Backup” at the bottom of the drop-down menu.
- Follow the instructions … and within an hour or so (depending on how many files you have in your backup drive), your music, videos, settings, and other personal files should be back where they belong. Phew!
Questions about this whole process? Let me know!


Trackbacks/Pingbacks